How to Configure Linksys Routers via Setup Wizard?
In an effort to get uninterrupted internet access, most people prefer installing Linksys WiFi routers. However, not everyone is well-versed with technical terms and connections. To help such users, we have come up with this guide on how to configure Linksys routers using the setup wizard. All you need to do is apply the steps in the same manner and you are all set to enjoy internet access. Let’s start.
Let’s Configure Linksys Routers with Ease
Let us tell you that the Linksys setup wizard is a browser-based built-in setup wizard that needs a compatible and up-to-date internet browser to complete the installation process. Hence, update your browser to the most recent version before you start.
Apart from that, ensure to have a reliable internet connection so that the process can be carried out smoothly. Note down the Linksys router login and WiFi details.
Follow the instructions as described ahead:
- The placement of the devices is vital. While you configure Linksys routers, it is essential that you place them close to the internet modem.
- Once done, take an Ethernet cable to link the LAN port on the modem and the Internet port on the router. You are suggested to verify that the connection is well-intact.
- Plug in the router now to supply power. Check the lights on it. Ensure that the Internet port light is flashing. This signifies the establishment of the connection.
- Use a WiFi-enabled computer or laptop to connect to the router’s network.
Locate Default WiFi Name & Password
Get the Linksys router’s WiFi name and password mentioned on its label. The default SSID or network name should look like LinksysXXXXX. Know that XXXXX is the 5 digits of the router’s serial number.
- We recommend running a LAN cable from the router to the computer/laptop to join the network. A wired connection is always better. However, ensure to make a finger-tight connection by inserting the cable firmly into the right ports.
- Open up the browser now.
- In the browser’s address field, type 192.168.1.1 which is the default IP address to configure Linksys routers and manage its settings later on.
- An alternative to the IP address is the URL myrouter.local.
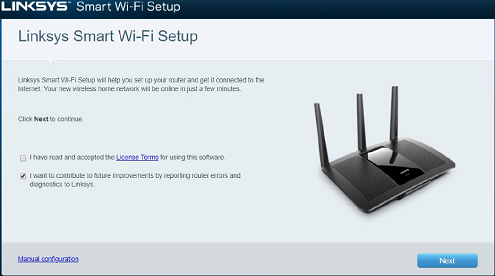
- As soon as you press the Enter key after inserting the IP or URL, the setup wizard appears.
- Click on the check box to agree to the License Terms. Click Next.

- Configure WiFi settings and assign WiFi names and passwords for 2.4 GHz and 5 GHz network bands.
- Next, create the router password. This is the admin password for your Linksys router that’ll help you access its settings locally.
- A page displaying the configured router settings will appear.
- Verify the settings and click Save.
- Join the new WiFi SSID that you created and click Next.
- You can now register your router or skip it for now.
- Click Done and OK.
Final Thoughts
This way you can configure Linksys routers using the setup wizard. We expect that you have found the instructions easy to understand and simple to perform. All you should do now is to connect to your router’s network and access the internet.

